
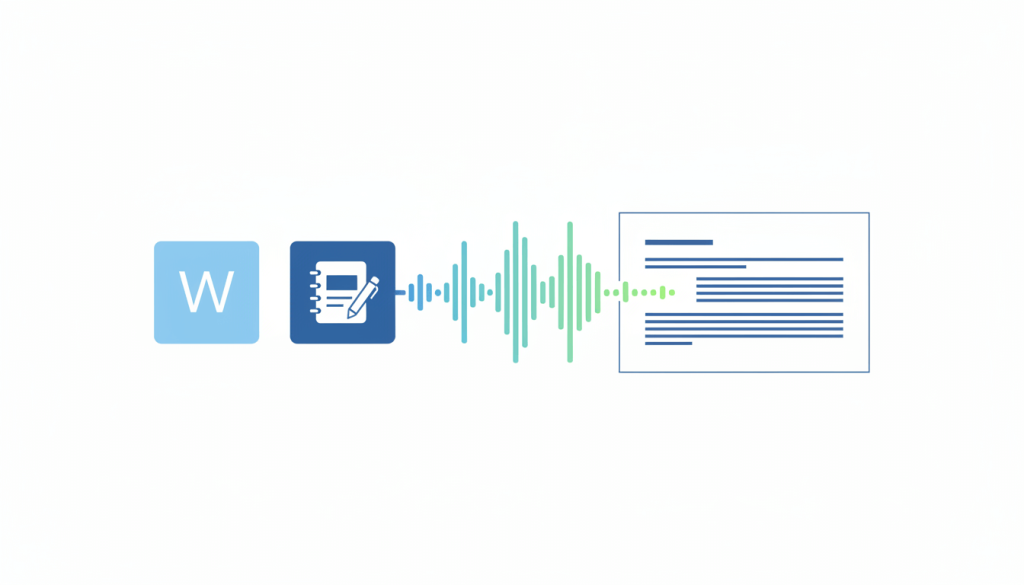
Turning audio into clean, readable text is one of the quickest ways to repurpose interviews, meetings, lectures, and voice notes. The good news: if you already use Microsoft 365, you may be able to transcribe audio into text directly in Word and OneNote without extra software.
This guide shows you exactly how to do it, how to fix common issues (like not seeing the Transcribe button), and how to turn a raw auto-transcript into something you can actually share or publish.
If you need a transcript that’s court-ready, research-grade, or client-facing, you’ll also see when it’s smarter to hand it to professionals (and how to do that fast).
Before you start: what you’ll need (and what catches people out)
Microsoft’s transcription tools are powerful, but they’re not available in every setup.
Best chance of success if you have:
- An active Microsoft 365 subscription signed in on the correct account
- A stable internet connection
- Chrome or Microsoft Edge (often required for the transcription experience)
- Audio in a supported format: .wav, .mp3, .m4a, .mp4
Common blockers:
- You’re using a Microsoft account without the right subscription
- Your organisation’s tenant restrictions block transcription features
- You’re in a Government/GCC-style environment where features differ
- You’re in OneNote/Word versions that don’t include Transcribe
Don’t worry — there’s a troubleshooting section later that covers these exactly.
Transcribe audio into text in Word (two methods)
If you’re searching “how to transcribe on Word”, these are the two workflows you want:
- Record directly in Word (great for meetings and interviews)
- Upload an audio file into Word (best for existing recordings)
Option 1: Record directly in Word and transcribe
Use this when you want to capture a live conversation and get a transcript afterwards.
Step-by-step
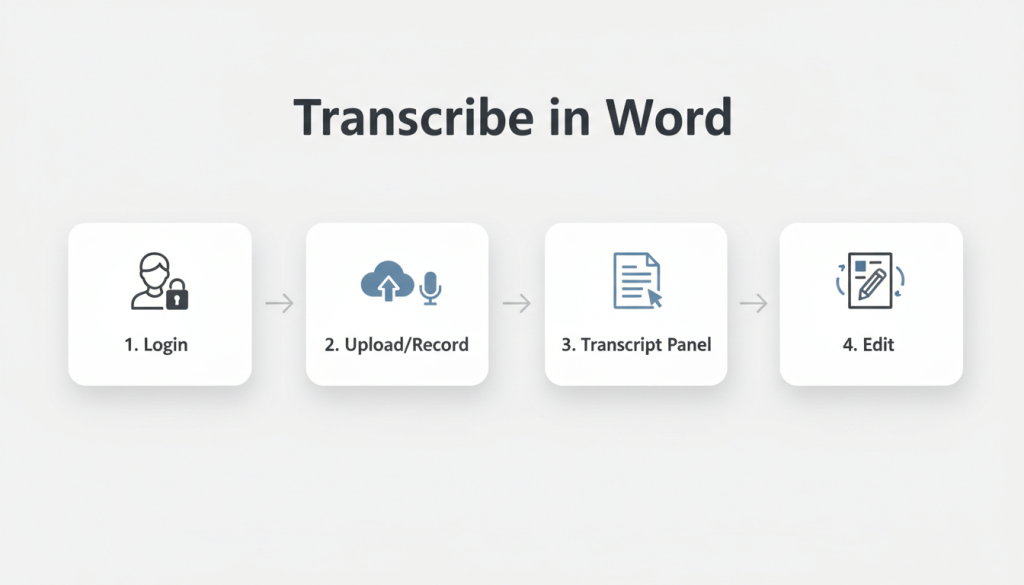
- Open Word and sign into your Microsoft 365 account.
- Create a new document (or open an existing one for notes).
- Go to Home and find Dictate, then choose Transcribe.
- In the Transcribe panel, click Start recording.
- If prompted, allow microphone permissions in your browser or app.
- Speak clearly and keep the Transcribe panel open while recording.
- When finished, select Save and transcribe now.
- Wait for processing to complete (it can take close to the length of the audio).
Pro tip (audio quality): If you’re recording a virtual call, don’t rely on a headset mic that only captures your voice. Aim for a setup that captures both sides clearly — poor audio equals messy transcripts and extra editing.
Option 2: Upload an audio file into Word and transcribe
Use this when you already have an interview recording, Zoom file, lecture, or voice note.
Step-by-step
- Open Word and sign into Microsoft 365.
- Go to Home → Dictate → Transcribe.
- In the panel, choose Upload audio.
- Select your audio file (.wav, .mp3, .m4a, .mp4).
- Keep the Transcribe panel open while it processes.
- Once complete, review sections and speaker labels.
How to edit and format the transcript in Word (so it’s usable)
Auto-transcripts are rarely ready to send as-is. Word gives you tools to clean it up quickly.
In the Transcribe panel, you can:
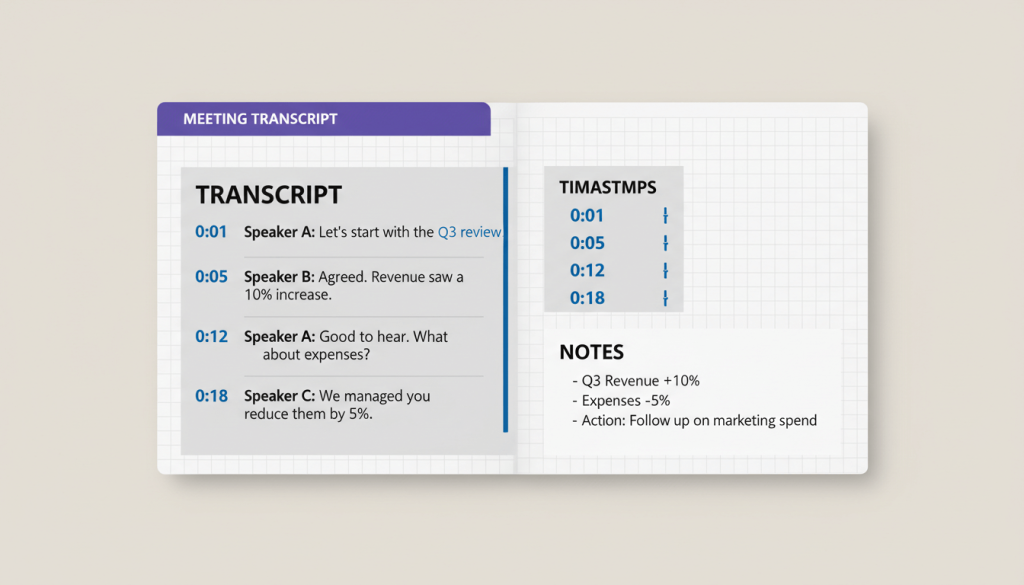
- Click a timestamp to replay the exact moment
- Rename speakers (e.g., “Speaker 1” to “Interviewer”)
- Edit individual transcript sections for accuracy
- Add only the sections you need to the document, or insert the full transcript
A simple 10-minute clean-up workflow
- Speaker pass: rename speakers and check obvious misattributions
- Meaning pass: correct misheard names, numbers, places, and key terms
- Readability pass: tidy punctuation, remove filler where appropriate, fix formatting
If you want a polished, client-ready format, our team can deliver that for you via Transcription Services (including verbatim and intelligent verbatim options).
Transcribe audio into text in OneNote (step-by-step)
If you’re searching “how to transcribe in OneNote” or “how to transcribe on one note”, here’s the cleanest way to do it.
OneNote is especially useful if you like taking notes while recording — your notes (and even ink/pen strokes in supported versions) can line up with the audio so you can jump back to key moments.
Option 1: Record in OneNote and transcribe
Step-by-step
- Open OneNote and sign into Microsoft 365.
- Go to Home → Transcribe.
- Select Start recording.
- Take notes as you go (optional, but recommended).
- When finished, select Save and transcribe now.
- Wait for transcription to complete, then review sections and speakers.
Option 2: Upload audio to OneNote and transcribe
Step-by-step
- Open OneNote and go to the page where you want the transcript saved.
- Go to Home → Transcribe → Transcribe.
- Select Upload audio.
- Choose your file (.wav, .mp3, .m4a, .mp4).
- Keep the panel open while it processes.
- Edit speaker names and correct errors.
When OneNote is the better choice than Word
Choose OneNote transcription when:
- You want the transcript stored alongside meeting notes
- You prefer a notebook structure (projects, clients, subjects)
- You need quick “jump-back” review while rewriting summaries
- You’re working through long recordings and want organisation
For client deliverables, you’ll usually still want to export to a clean Word format after editing.
The best results come from better audio (here’s a quick checklist)
If your transcript is messy, it’s often not “the tool” — it’s the recording.
Do this before you transcribe
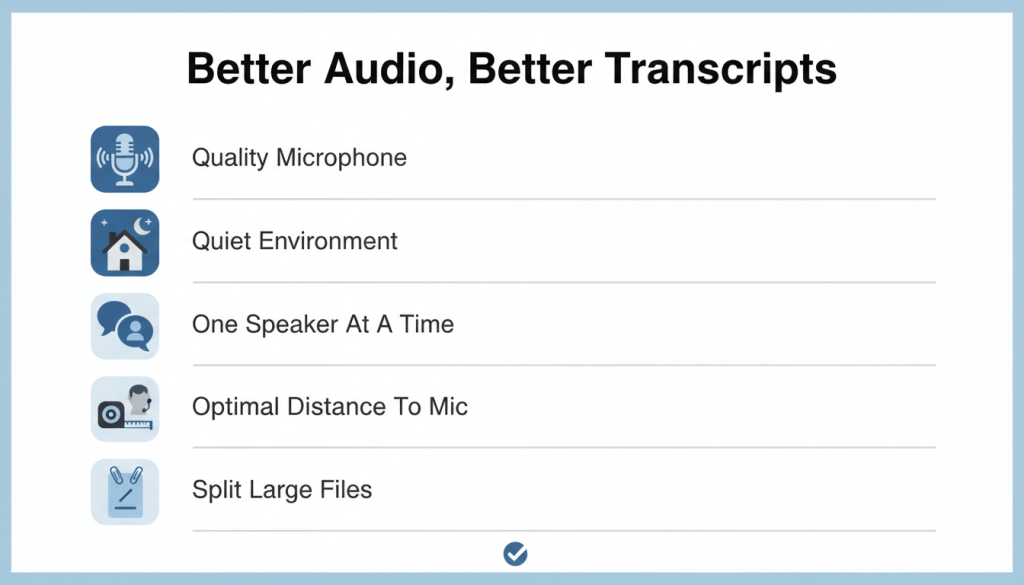
- Record in a quiet room (soft furnishings help reduce echo)
- Keep the microphone 15–30 cm from the speaker
- Ask people to speak one at a time (overlap breaks speaker detection)
- If it’s an interview, state names at the start (“This is Sara, I’m the interviewer…”)
- Avoid speakerphone in large rooms unless you have a proper conference mic
- If it’s a long file, consider splitting it into parts (easier to review and fix)
When the audio is poor or the stakes are high (legal, compliance, research), it’s often faster and safer to outsource. You can upload audio and request a quote here: Contact Us or view typical pricing on Price Rate.
Troubleshooting: “I can’t see the Transcribe button”
If Word or OneNote doesn’t show Transcribe, try these in order:
- Check you’re signed into the correct Microsoft 365 account
Many people have multiple accounts (personal + work). Transcribe may only appear on one. - Switch browser (use Edge or Chrome)
If you’re in a different browser, the feature may not appear or work reliably. - Update your app version (especially OneNote)
Some transcription features require newer builds. - Try Word on the web vs desktop (or vice versa)
Availability can differ depending on tenant and platform. - Organisation restrictions (tenant limitations)
Some corporate/government environments limit transcription features.
If you’re blocked and you still need a transcript quickly, you can skip the tech headaches and send the audio to our team for fast turnaround: Verbatim Transcription Services.
How to turn off Live Transcribe (and stop it popping up)
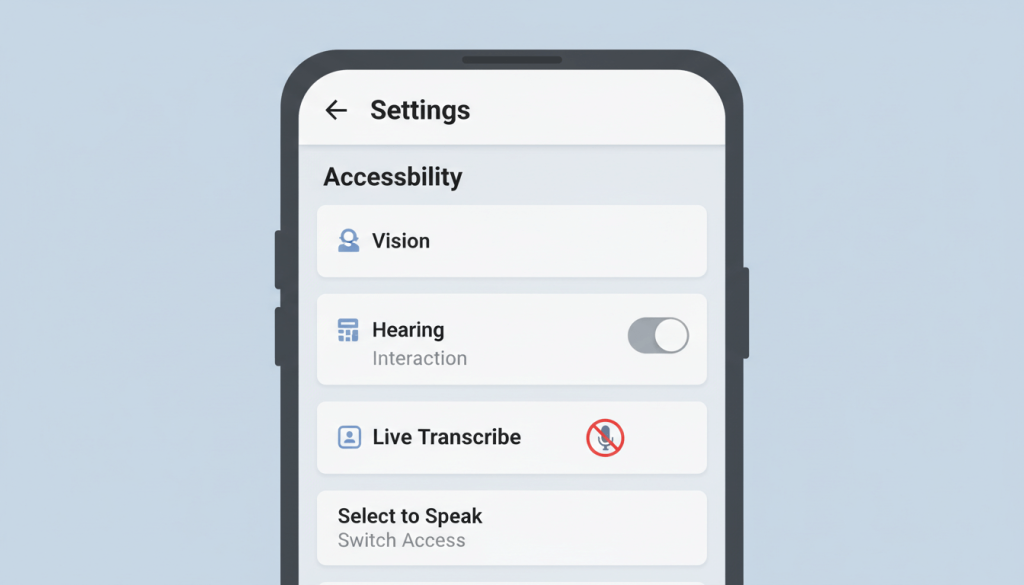
People often land on Word/OneNote transcription guides while trying to fix phone captions. If your question is “how do I turn off live transcribe”, here are quick fixes.
Turn off Live Transcribe on Android (common route)
- Open Settings
- Go to Accessibility
- Tap Live Transcribe
- Toggle it Off (and disable any shortcut/floating button)
Turn off Live Caption (often confused with Live Transcribe)
- Open Settings
- Go to Accessibility
- Tap Live Caption
- Toggle Use Live Caption off
If you still see it, check whether you enabled a shortcut via Quick Settings, volume controls, or the accessibility button.
When Word/OneNote transcription is enough (and when it isn’t)
Auto-transcription inside Microsoft tools is ideal for:
- Personal notes and drafts
- Quick meeting summaries
- First-pass transcripts for internal use
- Short interviews with clear audio and two speakers
It’s usually not enough when you need:
- Accurate speaker labelling in multi-speaker discussions
- Clean formatting for publication, legal use, or research submission
- Careful handling of names, numbers, and technical terminology
- Consistency in style (e.g., true verbatim vs intelligent verbatim)
- A transcript you can hand to a client without disclaimers
If that’s your situation, you can send us the recording and we’ll return a clean, editable transcript prepared by experienced transcribers: Transcription Services.
“We’re glad to have Transcribe Lingo as our long-term transcription partner, never lets you down!”
— Client feedback (from our case study library)
Quick example: turning a rough transcript into a clean, shareable format
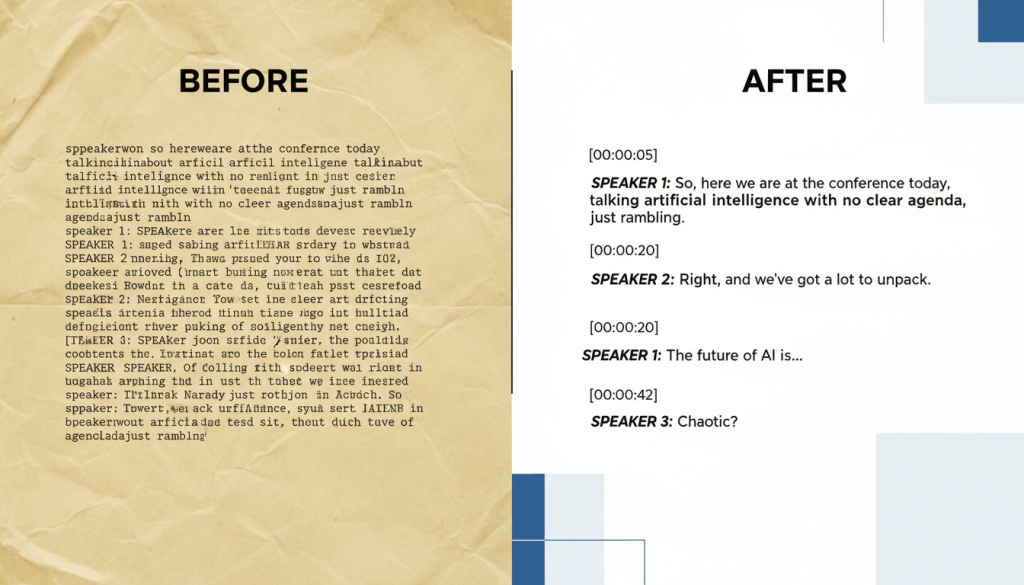
Here’s a simple structure you can copy into Word after transcription:
Interview Transcript (Clean Format)
- Project:
- Date:
- Participants:
- Recording length:
Transcript
[00:00:05] Interviewer: Thanks for joining. Could you introduce yourself?
[00:00:12] Participant: Yes, I’m Samir. I manage customer operations in retail…
[00:01:08] Interviewer: You mentioned “chargebacks” — what’s driving that increase?
[00:01:15] Participant: Mainly subscription confusion and refund delays…
Notes / Action points
- Theme 1:
- Theme 2:
- Follow-up questions:
- Quotes for report:
If you’re producing a report, you can also pull only key sections into your document rather than dumping the entire transcript.
Frequently asked questions
How do I transcribe audio into text in Word?
Open Word, go to Home → Dictate → Transcribe, then either Start recording or Upload audio. After processing, review and add the transcript to your document.
How to transcribe in OneNote?
In OneNote, go to Home → Transcribe, then record or upload audio. The transcript appears in sections that you can edit and label.
How to transcribe on one note if I can’t see the feature?
Make sure you’re signed into an account with an active Microsoft 365 subscription, update OneNote, and check platform limitations. If it’s still missing, your organisation may restrict it.
What audio formats work best?
Common supported formats include .wav, .mp3, .m4a, and .mp4. For best accuracy, use a clear recording with minimal background noise.
How do I turn off Live Transcribe?
On Android, go to Settings → Accessibility → Live Transcribe and switch it off. Also disable shortcuts (floating button, Quick Settings, or accessibility shortcut) if enabled.
Is Word/OneNote transcription accurate enough for legal or research use?
It can be a helpful first pass, but for legal, compliance, or publishable research, professional transcription is usually safer. If you need a verified, clean transcript, upload your file via our Contact page.